The purpose of this blog is to guide you through writing a basic node.js CRUD (CREATE, READ, UPDATE, DELETE) API which you can use as a foundation for any of your applications.
Though there are many node.js frameworks like Hapi, Sails, I wrote these Node.js API with an express framework, because it is very simple and enable us to write very minimal code by providing support for routing, middleware and thereby giving much flexibility than other frameworks.
Before getting started with writing Node.js API make sure you have installed the latest version of Node using below command,
sudo apt-get install nodejs
Also, we require npm (node package manager) to be installed through which we can install modules that are used in the API.
sudo apt-get install npm
node -v and npm -v will show the version of NODE and NPM installed on your machine
We’re using the Mongo database here. Refer to the official MongoDB installation manual and Install mongo DB based on your OS and version. You can check your installed MongoDB version using the mongo –version.
Then, create a database in MongoDB with the name of your choice. I named it as notes_blog.
Here in this example, I created an application to add, display, update and delete notes. To start with the application.
Create a folder named manage_notes. Locate the folder in the terminal and give npm init. This will prompt you with any questions. Press enter for all the questions, and it will initialize your application with the package.json file.
Paste the below code into the package.json and save it. In the terminal run “npm install.” This will install the packages defined in the dependencies section of package.json to the project.
package.json
{
"name": "blog2",
"version": "1.0.0",
"description": "",
"main": "index.js",
"scripts": {
"test": "echo \"Error: no test specified\" && exit 1"
},
"author": "",
"license": "ISC",
"dependencies": {
"mongoose": "~5.1.8"
}
}
Also Read
Setup Node.js, Nginx And MongoDB On Ubuntu 16.04
Create a folder named “DB” in the root of the application and again create a file with the following content inside that folder. This file would hold the code to connect to the Mongo database. Paste the following code in Mongoose.js.
const mongoose = require('mongoose');
mongoose.Promise = global.Promise;
let db_url = 'mongodb://localhost:27017/notes_blog'
mongoose.connect(db_url)
.then(() => {
console.log(`mongoose connected to: ${db_url}`)
}).catch((e) => {
console.log(`mongoose connection error: ${e}`)
})
module.exports.mongoose = mongoose;
Here the Mongoose module is used to interact with the database. Mongoose connect method is used to establish the connection to the mongo database.
Let’s create a starting point for our application, by creating a file named server.js in the root folder of the application and paste the following code.
Server.js
const express = require('express');
const bodyParser = require('body-parser');
const app = express();
const port = 3000;
app.use(bodyParser.json());
app.use(bodyParser.urlencoded({extended: false}));
const mongoose = require("./db/connect_mongo");
const notesRoute = require('./routes/notes.route');
app.use('/', notesRoute);
app.listen(port, () => {
console.log('We are live on ' + port);
});
Related Post
How To Interact With Database Using Async Module In Node.js
First, express and body-parser modules are imported. bodyParser.json(), bodyParser.urlencoded() are middlewares of body-prser module that have access to request objects, transform them and exposes it to the req.body object which then can be accessed in our routes. Then, initialize your app as an instance of the Express framework, and add the body-parser middleware using express’s app.use() method. I also required the “connect_mongo.js” file to establish a connection to DB before listening to the port. Then I made the app to listen to the port 3000 using app.listen() function.
In spite of writing all code in a single file, I am going to split it into multiple files, following the MVC design pattern which helps in the readability of the code and helps to handle better when the size of the application grows in the future.
Here M stands for model, which holds function code related to the database. V stands for the view which is beyond the scope of this blog. C for the controller which acts as the intermediator between view and model and also accepts the incoming request, and in turn calls the corresponding model function based on the request, processes it and sends the response back to the view. Here there is an additional route file inside the folder called routes, which resolve the requested URL from view to a particular controller.
Create another file named notes.model.js inside a newly created folder called to model and paste the following code,
const mongoose = require("mongoose");
let notesSchema = new mongoose.Schema({
  "title": {type: String},
  "dscription":{ type: String}
});
// A function to fetch from the notes collection based on the query
notesSchema.statics.fetchNotes = function fetchNotes(nodeTitle) {
  return new Promise((resolve, reject) => {
    this.find()
      .then((existingNotes) =>{
        return resolve(existingNotes);
      })
      .catch((err) =>{
        return reject(err);
      });
  });
};
// A function to fetch particular note from the notes collection based on the Id
notesSchema.statics.fetchNoteById = function fetchNotes(nodeId) {
    return new Promise((resolve, reject) => {
    let query = { "_id":nodeId };
      this.find(query)
        .then((note) =>{
          return resolve(note);
        })
        .catch((err) =>{
          return reject(err);
        });
    });
  };
// A function to save a note to the notes collection
notesSchema.statics.saveNote = function saveNote (newNote) {
  return new Promise((resolve, reject) => {
    Note.collection.save(newNote)
      .then((savedNote) =>{
        return resolve(savedNote);
      })
      .catch((err) =>{
        return reject(err);
      });
  });
};
// A function to update a note with note_id
notesSchema.statics.updateNote = function updateNote (noteId, updatedNote) {
  return new Promise((resolve, reject) => {
    let query = { _id: mongoose.Types.ObjectId(noteId) };
    Note.collection.findOneAndUpdate(query, updatedNote, {returnOriginal: false}) //returnOriginal: false will return the updated document
      .then((updatedNote) => {
        return resolve(updatedNote.value);
      })
      .catch((err) => {
        return reject(err);
      });
  });
};
// A function to delete a note from notes collection with node_id
notesSchema.statics.deleteNote = function deleteNote(noteId){
let query = { "_id": mongoose.Types.ObjectId(noteId) };
  return new Promise((resolve, reject) => {
    this.findByIdAndRemove(query)
      .then(() =>{
        return resolve();
      })
      .catch((err) =>{
        return reject(err);
      });
  });
};
let Note = mongoose.model("Note", notesSchema, "notes"); //set collection name otherwise it forces a plural
module.exports = { Note };
Mongoose module is again required in this file and then, defined the structure of how our notes collection should look like. This notes collection contains two fields title and description with datatype as a string. All the functions that save, lists, update, delete notes to the Mongo database are also written in this file.
Create a file named notes.controller.js inside a newly created folder called controller with the following code.
let { Note } = require("./../model/notes.model.js");
exports.addNote = function (req, res) {
let newNote = {};
newNote.title = req.body.title;
newNote.description = req.body.description;
Note.saveNote(newNote)
.then((savedNote)=>{
res.send(savedNote.ops[0]);
})
.catch((err)=>{
res.send(err)
})
};
exports.displayNote = function (req, res) {
Note.fetchNotes()
.then((notes)=>{
if(notes.length > 0){
res.send(notes);
} else {
res.send(`No Notes to display`);
}
})
.catch((err)=>{
res.send(err)
})
};
exports.displayNoteById = function (req, res) {
  let noteId = req.params.id
  Note.fetchNoteById(noteId)
  .then((notes)=>{
  if(notes.length > 0){
  res.send(notes);
  } else {
  res.send(`Note with id ${noteId} doesn't exist`);
  }
  })
  .catch((err)=>{
  res.send(err)
  })
  };
exports.removeNote = function (req, res) {
let noteId = req.params.id
Note.deleteNote(noteId)
.then(()=>{
res.send(`Note successfully deleted`);
})
.catch((err)=>{
res.send(err)
})
};
exports.modifyNote = function (req, res) {
let noteIdToBeUpdated = req.params.id
let modifiedNote = req.body
Note.updateNote(noteIdToBeUpdated,modifiedNote)
.then((updatedNote)=>{
  res.send(
    {
      mesage:"Note updated successfully",
      data:updatedNote
    }
  );
})
.catch((err)=>{
console.log(err);
res.send(err)
})
};
Finally to define the routes for application, create a file named notes.route.js inside a newly created folder called routes with the following code.
const express = require('express');
const router = express.Router();
const notesController = require('../controller/notes.controller')
router.post('/saveNote', notesController.addNote);
router.get('/listNote', notesController.displayNote);
router.get('/listNote/:id', notesController.displayNoteById);
router.delete('/removeNote/:id', notesController.removeNote);
router.put('/updateNote/:id', notesController.modifyNote);
module.exports = router;
This file required the controller file (notes.controller.js) which we defined before.
Remember to include this notes.route.js file in server.js before the app.listen() function. Based on the URL request from the client-side, the route is matched, and the corresponding controller method is called from here which in turn will call the respective model function, and the response is returned back to the client.
In the end, your folder structure should be like this,
manage_notes
node_modules
package.json
server.js
db
connect_mongo.js
controller
notes.controller.js
models
notes.model.js
routes
notes.route.js
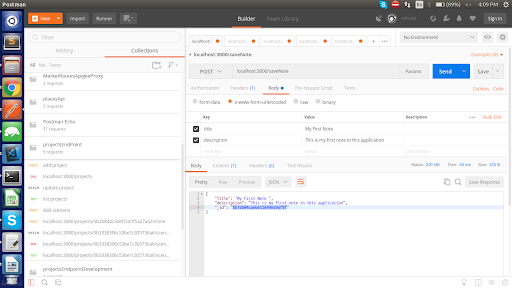
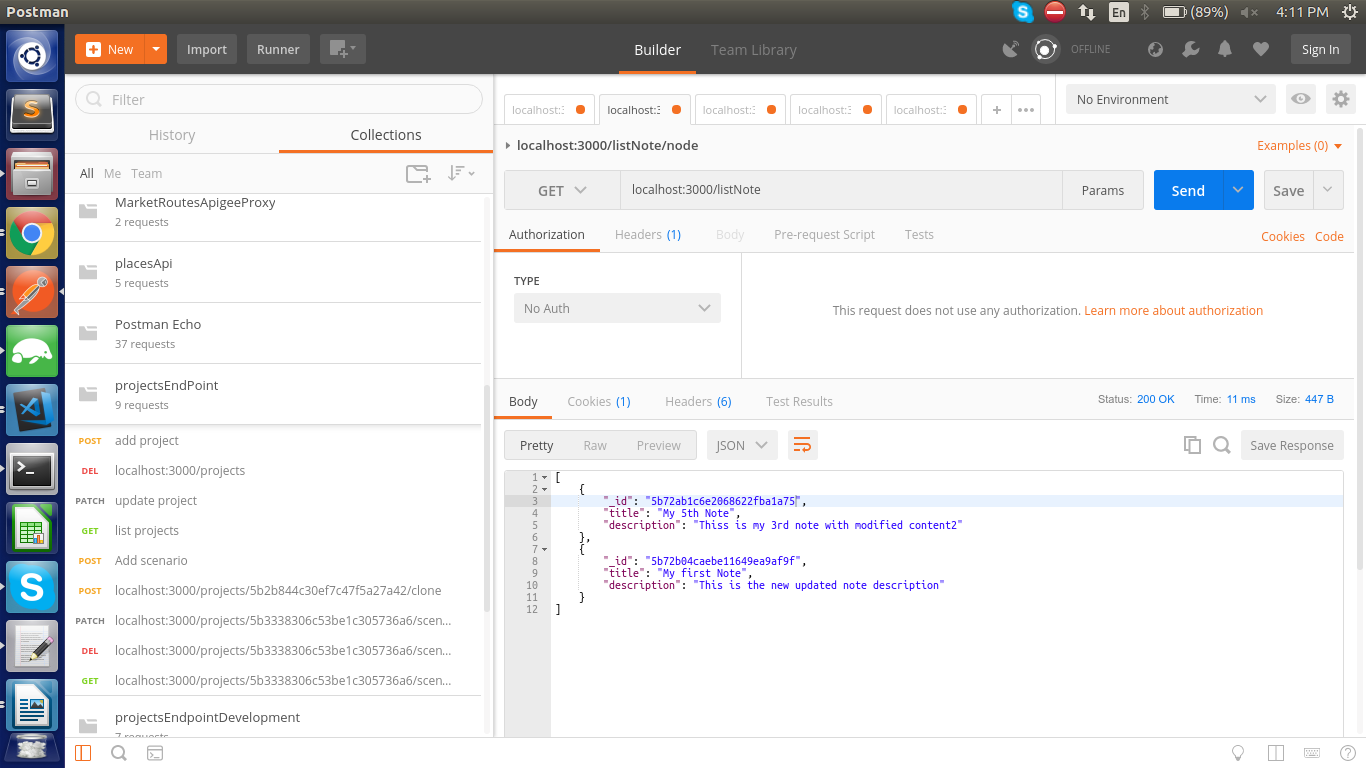
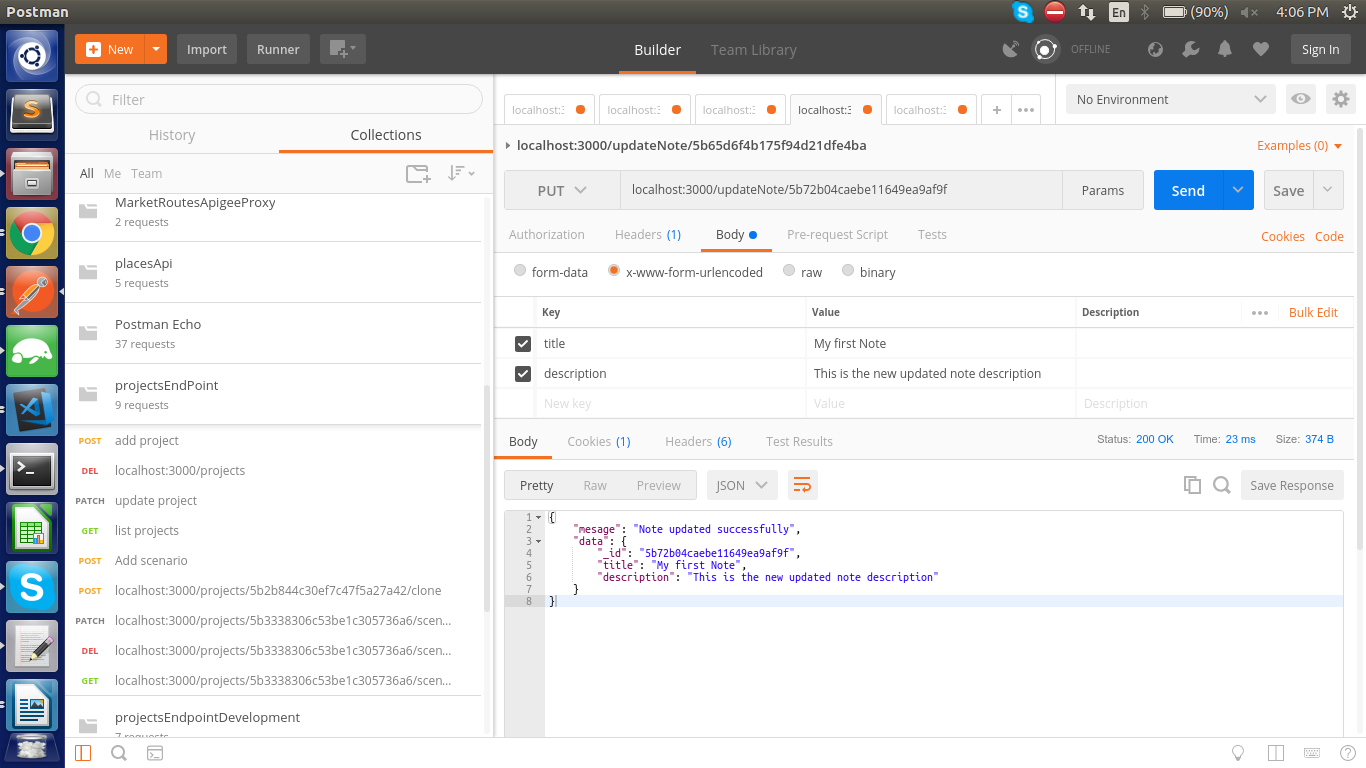
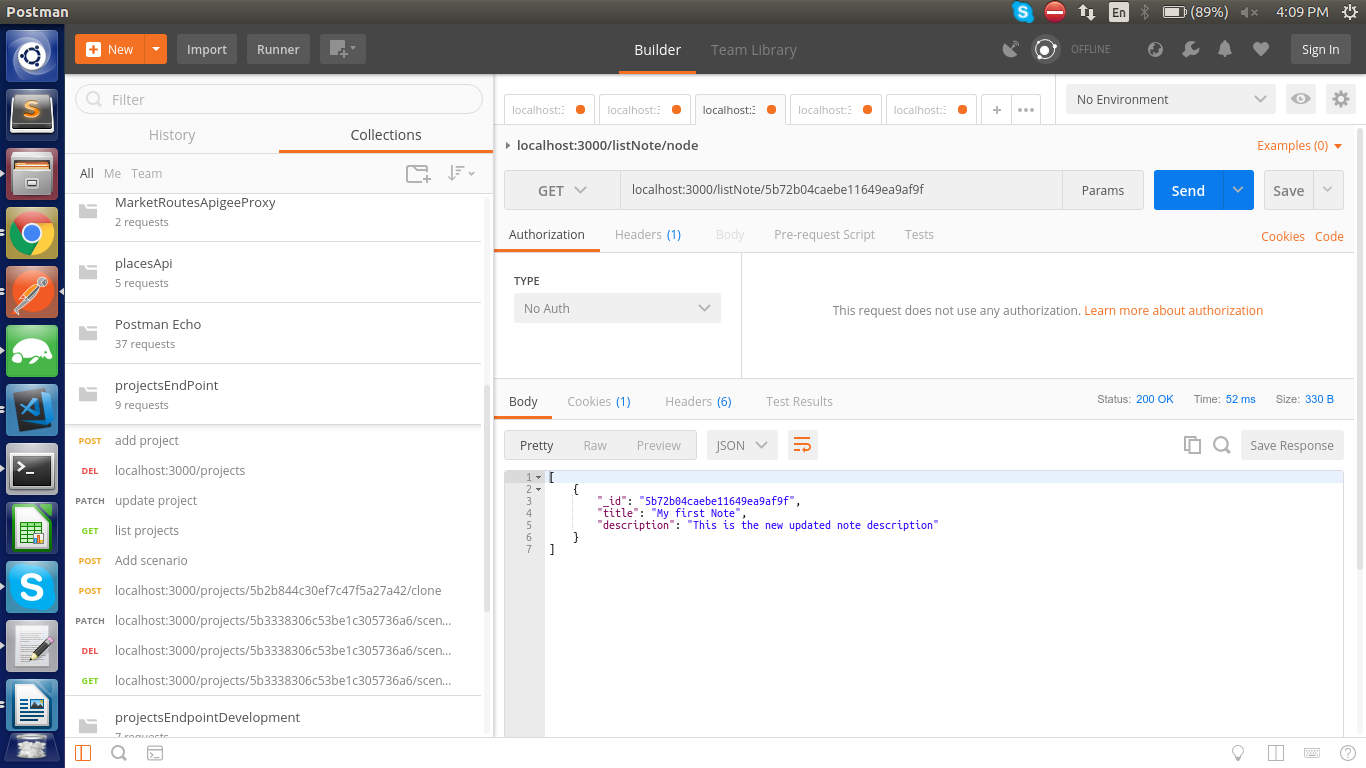
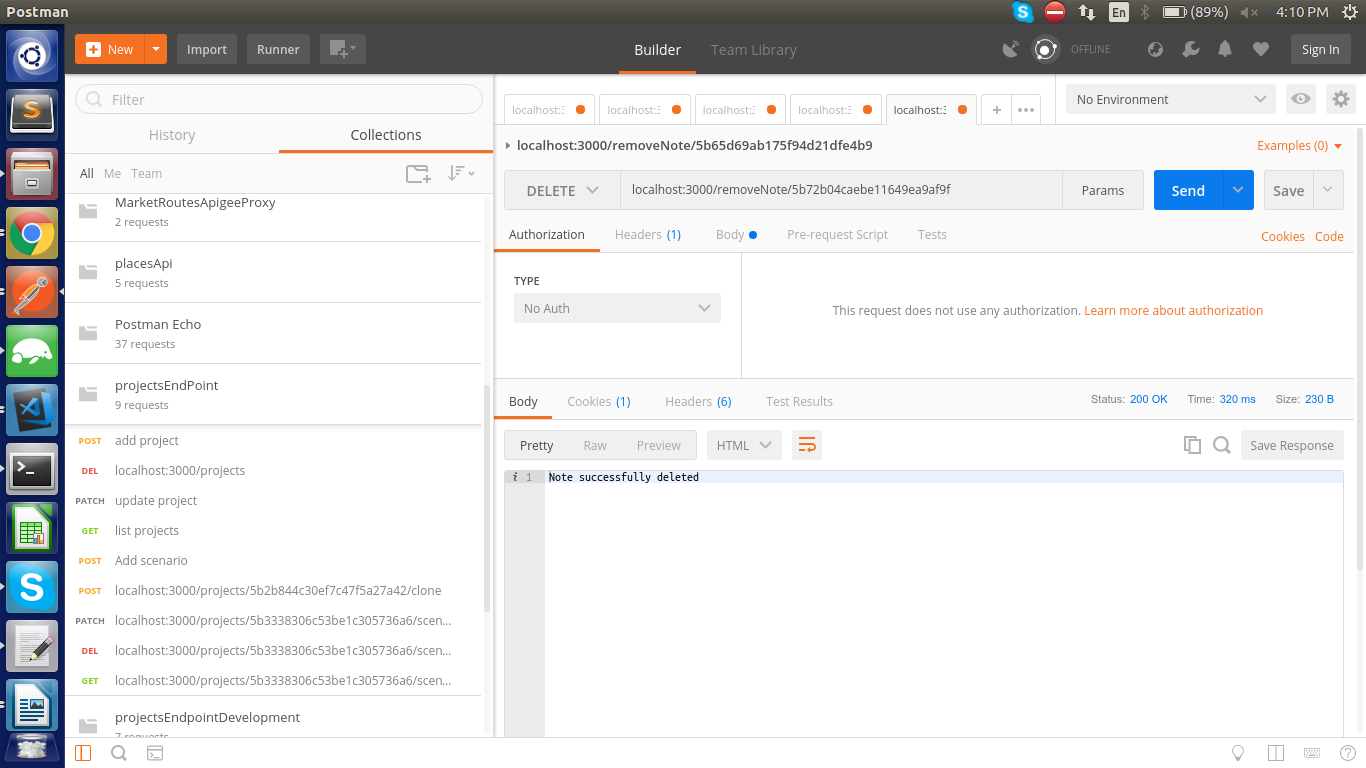
Save all the files and locate the application folder in the terminal and enter “npm start.” Now you can see server listening to the port 3000(as mentioned in the server.js file). To test the APIs, we use an application called postman from where the HTTP request can be made with request or query or body parameters.
Testing The API In Postman
Saving a note
Display a note by Id
Display all notes
Update a note
Delete a note
That’s all! Now keep this as a base, apply this CRUD operation and start creating your own Node.JS API.
Similarly, you can learn more on the latest topics, never miss out on anything from our largest blog portal where you can get continuous blog updates & latest posts about all latest technologies which would be perfect for your 15 minutes tea break! In case if you’re a newbie then don’t forget to subscribe to us to get the latest updates from diverse technologies. What else guys hit the subscribe link and go crazy over learning. For more inquiries reach us via info@agiratech.com


